
Kotlin-Coroutines-Dispatcher调度原理
Kotlin-Coroutines-Dispatcher调度原理
引入
Introduction-withContext(Dispatchers)
代码中经常会使用到withContext来切换线程,那到底是怎么做的呢?
fun main() {
    runBlocking {
        withContext(Dispatchers.Default) {
            println(Thread.currentThread().name)
            launch {
                delay(200)
                println(Thread.currentThread().name)
            }
            launch {
                delay(200)
                println(Thread.currentThread().name)
            }
        }
    }
}那我们传递的一个Dispatchers.Default到底是个什么东西?以及不同的Dispatcher是什么?各有什么作用?
首先我们需要先理清楚
Kotlin预置了4中不同的Dispatcher
- Dispatchers.Default: 默认Dispatcher,适合CPU计算型任务
- Dispatchers.Main: 基于不同平台下的主线程的Dispatcher,在Android、JavaFX、Swing等有不同表现
- Dispatchers.IO: 适合执行大量IO任务等Dispatcher
- Dispatchers.Unconfined:未定义的Dispacther
Dispatchers.Main的继承关系
我们知道定义上,他们都基于CoroutineContext,看方法参数会发现其是一个CoroutineContext,这里以Dispatcher.Default为例,来看下其继承关系
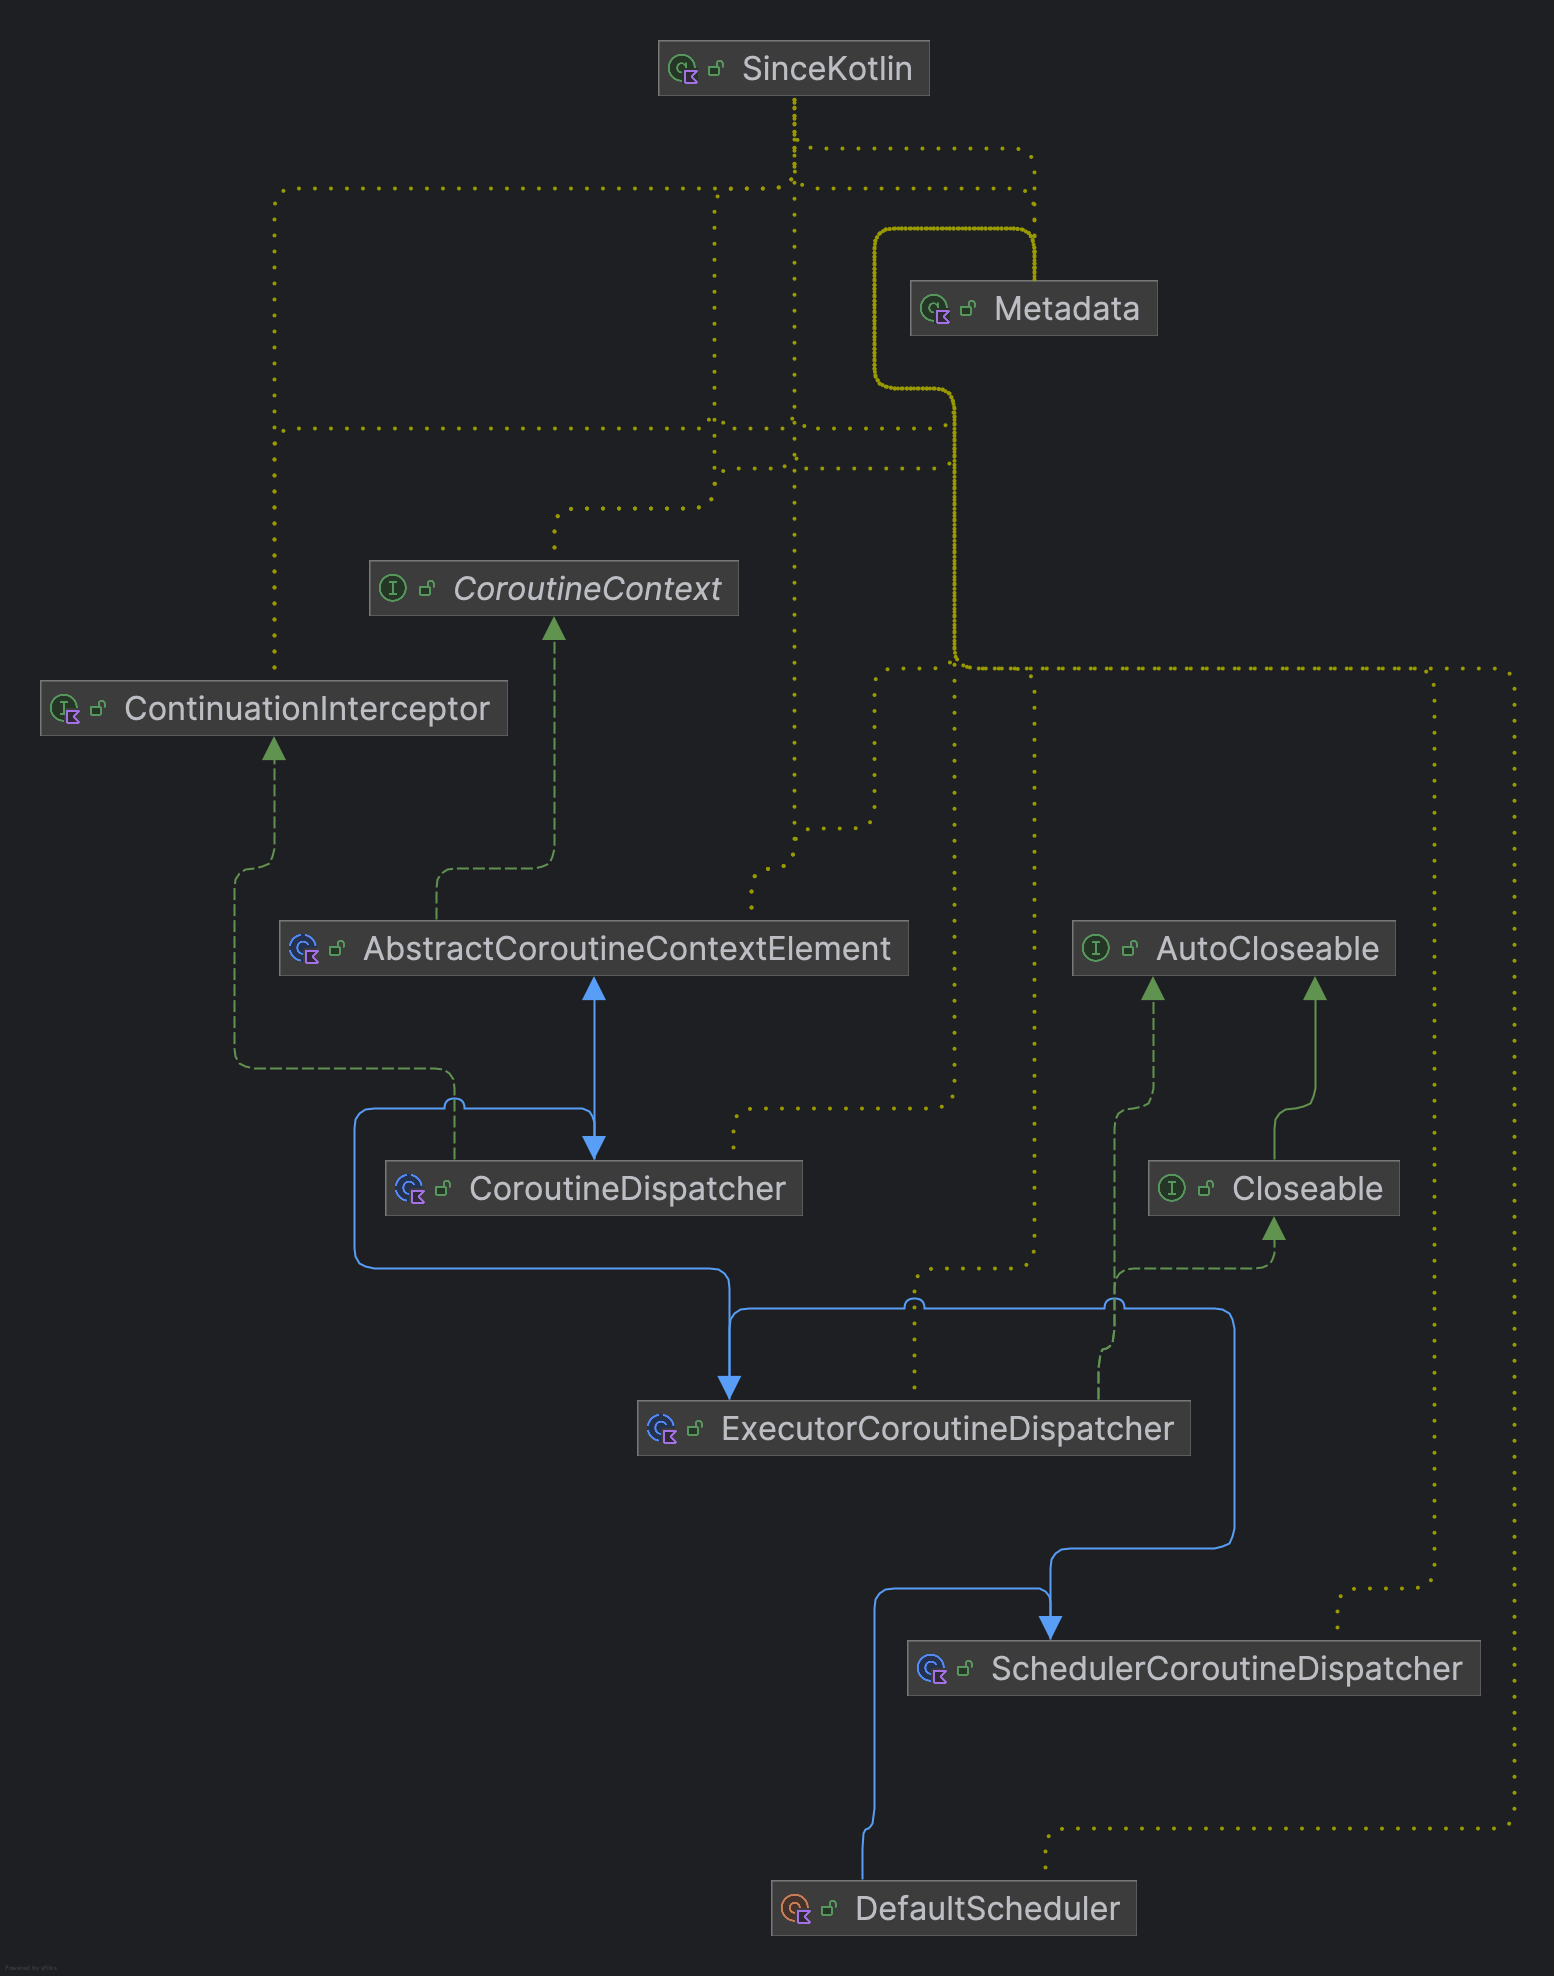
DefaultScheduler -> SchedulerCoroutineDispatcher -> ExecutorCoroutineDispatcher -> CoroutineDispatcher -> AbstractCoroutineContextElement(ContinuationInterceptor) -> Element -> CoroutineContext
public abstract class CoroutineDispatcher :
AbstractCoroutineContextElement(ContinuationInterceptor), ContinuationInterceptor

public abstract class AbstractCoroutineContextElement(public override val key: Key<*>) : Element会发现CoroutineDispatcher其实是继承于AbstractCoroutineContextElement也就是基于CorotineContext,并指定了Key为ContinuationInterceptor 而关于这个接口,其实我们之前已经有说过
ContinuationInterceptor 是 CoroutineContext 的一个元素,用来“拦截”协程的恢复 (resume),决定恢复代码在哪个线程/线程池上执行。因此我们得知这也是CoroutineDispatcher的职责。
代码梳理
WithContext如何启动
现在来看下withContext具体的代码实现
public suspend fun <T> withContext(
    context: CoroutineContext,
    block: suspend CoroutineScope.() -> T
): T {
    contract {
        callsInPlace(block, InvocationKind.EXACTLY_ONCE)
    }
    return suspendCoroutineUninterceptedOrReturn sc@ { uCont ->
        // compute new context
        val oldContext = uCont.context
        // Copy CopyableThreadContextElement if necessary
        val newContext = oldContext.newCoroutineContext(context)
        // always check for cancellation of new context
        newContext.ensureActive()
        // FAST PATH #1 -- new context is the same as the old one
        if (newContext === oldContext) {
            val coroutine = ScopeCoroutine(newContext, uCont)
            @Suppress("LEAKED_IN_PLACE_LAMBDA") // Contract is preserved, invoked immediately or throws
            return@sc coroutine.startUndispatchedOrReturn(coroutine, block)
        }
        // FAST PATH #2 -- the new dispatcher is the same as the old one (something else changed)
        // `equals` is used by design (see equals implementation is wrapper context like ExecutorCoroutineDispatcher)
        if (newContext[ContinuationInterceptor] == oldContext[ContinuationInterceptor]) {
            val coroutine = UndispatchedCoroutine(newContext, uCont)
            // There are changes in the context, so this thread needs to be updated
            withCoroutineContext(coroutine.context, null) {
                @Suppress("LEAKED_IN_PLACE_LAMBDA") // Contract is preserved, invoked immediately or throws
                return@sc coroutine.startUndispatchedOrReturn(coroutine, block)
            }
        }
        // SLOW PATH -- use new dispatcher
        val coroutine = DispatchedCoroutine(newContext, uCont)
        @Suppress("LEAKED_IN_PLACE_LAMBDA")  // Contract is preserved, invoked immediately or throws
        block.startCoroutineCancellable(coroutine, coroutine)
        coroutine.getResult()
    }
}suspendCoroutineUninterceptedOrReturn前文已提到过,它创建一个挂起点 (suspension point),把当前协程的 Continuation 暴露出来给你用,但不会自动加拦截器。这里不多赘述
在oldContext的基础上创建一个新的CoroutineContext,注释中提到这里可能复制CopyableThreadContextElement
实际在我们的代码中
- uCont: Main3Kt$main$1
- oldContext: CombinedContext(BlockingCoroutine, BlockingEventLoop)
- newContext: CombinedContext(BlockingCoroutine, Dispatcher.Default)
这里 最终会创建一个DispatchedCoroutine,包含了newContext(CoroutineContext)以及uCont(Continuation)其有这样的关系链
DispatchedCoroutine -> ScopeCoroutine -> AbstractCoroutine
然后又调用到我们熟悉的startCoroutineCancellable, 创建具体的SuspendLambda实现类并intercept,创建DispatchedContinuatin并通过dispatcher resume
因此现在似乎来到了核心,是不是这里dispatcher在分派的时候会额外做一些处理?
// DispatchedContinuation
@Suppress("NOTHING_TO_INLINE")
internal inline fun resumeCancellableWith(result: Result<T>) {
    val state = result.toState()
    if (dispatcher.safeIsDispatchNeeded(context)) {
        _state = state
        resumeMode = MODE_CANCELLABLE
        dispatcher.safeDispatch(context, this)
    } else {
        executeUnconfined(state, MODE_CANCELLABLE) {
            if (!resumeCancelled(state)) {
                resumeUndispatchedWith(result)
            }
        }
    }
}
因此我们来看基于CoroutineDispatcher的Dispatchers.Default 也就是DefaultScheduler这个类的dispatch方法,逻辑分叉应该出在这里
internal object DefaultScheduler : SchedulerCoroutineDispatcher(
    CORE_POOL_SIZE, MAX_POOL_SIZE,
    IDLE_WORKER_KEEP_ALIVE_NS, DEFAULT_SCHEDULER_NAME
)

internal open class SchedulerCoroutineDispatcher(
    private val corePoolSize: Int = CORE_POOL_SIZE,
    private val maxPoolSize: Int = MAX_POOL_SIZE,
    private val idleWorkerKeepAliveNs: Long = IDLE_WORKER_KEEP_ALIVE_NS,
    private val schedulerName: String = "CoroutineScheduler",
) : ExecutorCoroutineDispatcher()
首先注意到这个类是个单例,这也没有问题,同时是不是看到一些让我们觉得很熟悉的参数?corePoolSize,maxPoolSize,空闲线程存活时间,scheduler名称? 是不是有线程池的味道了?
我们知道Default Dispatcher适合来做计算型的Runnable,因此从设计上,我们来看看它是如何配置的?
- 核心线程数与CPU数目一致
@JvmField
internal val CORE_POOL_SIZE = systemProp(
    "kotlinx.coroutines.scheduler.core.pool.size",
    AVAILABLE_PROCESSORS.coerceAtLeast(2),
    minValue = CoroutineScheduler.MIN_SUPPORTED_POOL_SIZE
)- 最大线程数目 1 << 21 - 2,即支持大量空闲线程,这里为什么要这样设置呢?这其实跟位运算以及状态标志有关,后面我们会讲到
@JvmField
internal val MAX_POOL_SIZE = systemProp(
    "kotlinx.coroutines.scheduler.max.pool.size",
    CoroutineScheduler.MAX_SUPPORTED_POOL_SIZE,
    maxValue = CoroutineScheduler.MAX_SUPPORTED_POOL_SIZE
)
同时也是基于state来进行size的管控,使用到Atomic到CAS操作
那我们直接来看看dispatch到底做了什么?
// SchedulerCoroutineDispatcher
override fun dispatch(context: CoroutineContext, block: Runnable): Unit = coroutineScheduler.dispatch(block)

private var coroutineScheduler = createScheduler()

private fun createScheduler() =
CoroutineScheduler(corePoolSize, maxPoolSize, idleWorkerKeepAliveNs, schedulerName)可以看到,这里其实是实例化一个CoroutineScheduler来dispatch这个block,并没有用到context。
总结
至此,让我们先总结一下,Dispatcher.Default实质是基于SchedulerCoroutineDispatcher,而SchedulerCoroutineDispatcher实质只是一层表皮or封装类,代表的是key值为ContinuationInterceptor的CoroutineContext.Element,用于分派任务的。实际具体分发和执行操作是交给SchedulerCoroutineDispatcher中的CoroutineScheduler对象来执行的。
因此我们来看看CoroutineScheduler又是个什么?
CoroutineScheduler进行实际任务分派
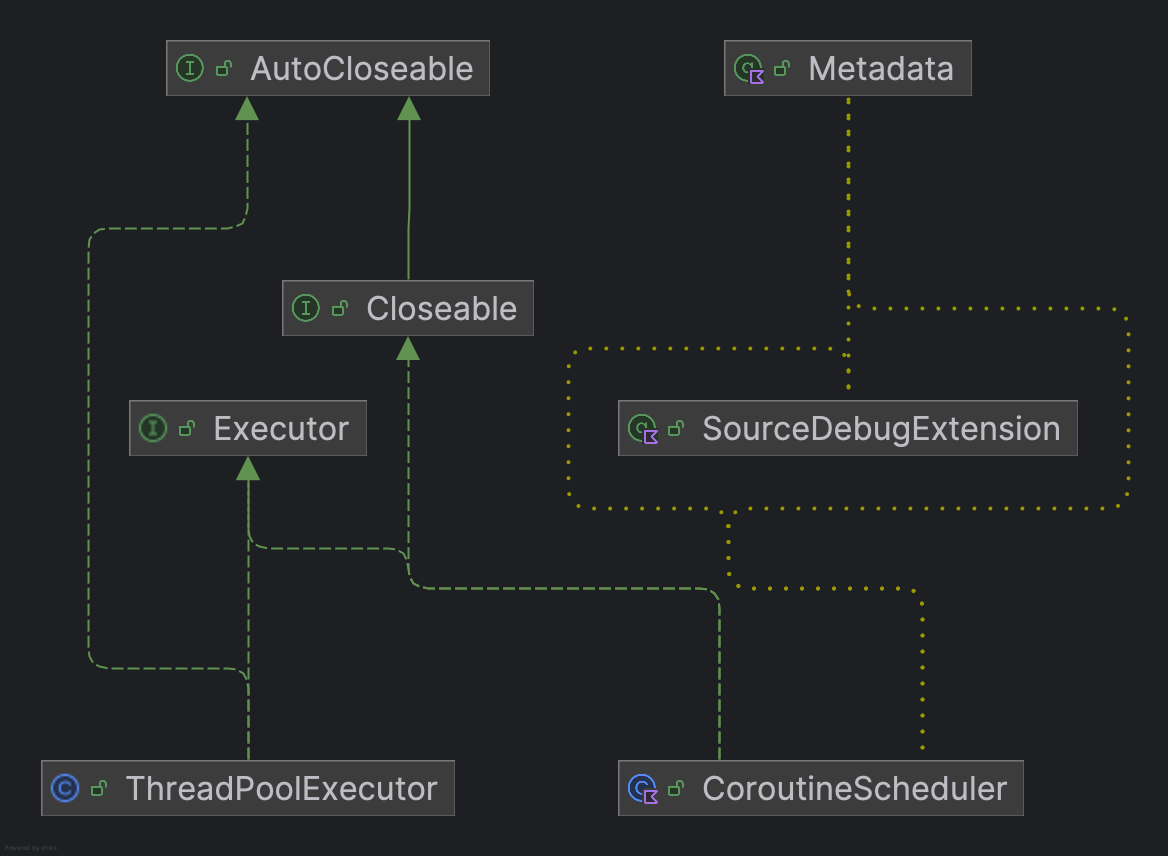
诶,发现这个CoroutineScheduler其实是Executor的实现类,Executor对我们来说是不是又有点熟悉了?想到了ThreadPoolExecutor,基于Executor
Executor 规定了什么?
An object that executes submitted Runnable tasks. This interface provides a way of decoupling task submission from the mechanics of how each task will be run, including details of thread use, scheduling, etc. An Executor is normally used instead of explicitly creating threads.
一个用于执行提交的 Runnable 任务的对象。这个接口提供了一种方法,可以将任务的提交与任务的执行机制解耦,包括线程使用、调度等细节。通常,Executor 会被用来代替直接创建线程的方式。
因此,联想到实际应用,这里的CoroutineScheduler**应该也是规定了提交并执行block块的方式。因此我们来看其dispatch方法
对CoroutineScheduler先有一个大致的了解,线程安全通过 synchronized锁 + CAS原子操作保证,内置atomic的状态量state,并维护存放worker的线程队列workers
dispatch流程
fun dispatch(block: Runnable, taskContext: TaskContext = NonBlockingContext, fair: Boolean = false) {
    trackTask() // this is needed for virtual time support
    val task = createTask(block, taskContext)
    val isBlockingTask = task.isBlocking
    // Invariant: we increment counter **before** publishing the task
    // so executing thread can safely decrement the number of blocking tasks
    val stateSnapshot = if (isBlockingTask) incrementBlockingTasks() else 0
    // try to submit the task to the local queue and act depending on the result
    val currentWorker = currentWorker()
    val notAdded = currentWorker.submitToLocalQueue(task, fair)
    if (notAdded != null) {
        if (!addToGlobalQueue(notAdded)) {
            // Global queue is closed in the last step of close/shutdown -- no more tasks should be accepted
            throw RejectedExecutionException("$schedulerName was terminated")
        }
    }
    // Checking 'task' instead of 'notAdded' is completely okay
    if (isBlockingTask) {
        // Use state snapshot to better estimate the number of running threads
        signalBlockingWork(stateSnapshot)
    } else {
        signalCpuWork()
    }
}需要注意的是,这里的block是一个DispatchedContinuation 内部包装的是SuspendLambda的代理类,再来回顾一下
这里会先尝试将Runnable创建为一个Task,而在实际场景中,DispatchedContinuation已经为Task了,所以只是更新一下任务的提交时间和taskContext(TaskContext是一个boolean值,默认为NonBlockingContext-False)。然后获取到Thread并转化为Worker,通过Worker插入到queue。
在初次dispatch时,currentWork为null,此时会尝试将task添加到globalCpuQueue(non-blocking) 以及 globalBlockingQueue(blocking)。并且signal对应的work,比如常规情况下是Non-Blocking
fun signalCpuWork() {
    if (tryUnpark()) return
    if (tryCreateWorker()) return
    tryUnpark()
}

private fun tryUnpark(): Boolean {
        while (true) {
            val worker = parkedWorkersStackPop() ?: return false
            if (worker.workerCtl.compareAndSet(PARKED, CLAIMED)) {
                LockSupport.unpark(worker)
                return true
            }
        }
    }
当signalCpuWork时,会尝试unpark可用的线程,其实是从parkkedWorkerStack中取出一个Worker,默认也为null,如果没有,则会尝试创建一个Worker
private fun tryCreateWorker(state: Long = controlState.value): Boolean {
    val created = createdWorkers(state)
    val blocking = blockingTasks(state)
    val cpuWorkers = (created - blocking).coerceAtLeast(0)
    /*
     * We check how many threads are there to handle non-blocking work,
     * and create one more if we have not enough of them.
     */
    if (cpuWorkers < corePoolSize) {
        val newCpuWorkers = createNewWorker()
        // If we've created the first cpu worker and corePoolSize > 1 then create
        // one more (second) cpu worker, so that stealing between them is operational
        if (newCpuWorkers == 1 && corePoolSize > 1) createNewWorker()
        if (newCpuWorkers > 0) return true
    }
    return false
}
本质也是先修改state(但并不是CAS)
检查下cpuWorkers是否比配置的corePoolSize值小,如果是,则create一个NewWorker
internal inner class Worker private constructor() : Thread()Worker是基于Thread的子类,并是CoroutineScheduler的内部类
private fun createNewWorker(): Int {
    val worker: Worker
    return synchronized(workers) {
        // Make sure we're not trying to resurrect terminated scheduler
        if (isTerminated) return -1
        val state = controlState.value
        val created = createdWorkers(state)
        val blocking = blockingTasks(state)
        val cpuWorkers = (created - blocking).coerceAtLeast(0)
        // Double check for overprovision
        if (cpuWorkers >= corePoolSize) return 0
        if (created >= maxPoolSize) return 0
        // start & register new worker, commit index only after successful creation
        val newIndex = createdWorkers + 1
        require(newIndex > 0 && workers[newIndex] == null)
        /*
         * 1) Claim the slot (under a lock) by the newly created worker
         * 2) Make it observable by increment created workers count
         * 3) Only then start the worker, otherwise it may miss its own creation
         */
        worker = Worker(newIndex)
        workers.setSynchronized(newIndex, worker)
        require(newIndex == incrementCreatedWorkers())
        cpuWorkers + 1
    }.also { worker.start() } // Start worker when the lock is released to reduce contention, see #3652
}可以看到这里其实是锁住ResizableAtomicArray类型的workers数组,进行了一些操作
包括检查线程池状态,cpuWorkers数量、创建的workers数量
创建一个Worker,并同步地设置创建一个新的array来赋值给workers,并启动这个worker,也就是线程
线程启动后,实际会调用run方法,因此我们来看下Worker的run方法实现,实际调用了runWorker这一个方法
private fun runWorker() {
    var rescanned = false
    while (!isTerminated && state != WorkerState.TERMINATED) {
        val task = findTask(mayHaveLocalTasks)
        // Task found. Execute and repeat
        if (task != null) {
            rescanned = false
            minDelayUntilStealableTaskNs = 0L
            executeTask(task)
            continue
        } else {
            mayHaveLocalTasks = false
        }
        /*
         * No tasks were found:
         * 1) Either at least one of the workers has stealable task in its FIFO-buffer with a stealing deadline.
         *    Then its deadline is stored in [minDelayUntilStealableTask]
         * // '2)' can be found below
         *
         * Then just park for that duration (ditto re-scanning).
         * While it could potentially lead to short (up to WORK_STEALING_TIME_RESOLUTION_NS ns) starvations,
         * excess unparks and managing "one unpark per signalling" invariant become unfeasible, instead we are going to resolve
         * it with "spinning via scans" mechanism.
         * NB: this short potential parking does not interfere with `tryUnpark`
         */
        if (minDelayUntilStealableTaskNs != 0L) {
            if (!rescanned) {
                rescanned = true
            } else {
                rescanned = false
                tryReleaseCpu(WorkerState.PARKING)
                interrupted()
                LockSupport.parkNanos(minDelayUntilStealableTaskNs)
                minDelayUntilStealableTaskNs = 0L
            }
            continue
        }
        /*
         * 2) Or no tasks available, time to park and, potentially, shut down the thread.
         * Add itself to the stack of parked workers, re-scans all the queues
         * to avoid missing wake-up (requestCpuWorker) and either starts executing discovered tasks or parks itself awaiting for new tasks.
         */
        tryPark()
    }
    tryReleaseCpu(WorkerState.TERMINATED)
}核心逻辑就是,从各种可能的taskQueue中去找到带执行的Task,若都没有,则park阻塞该线程
因此到这里我们也就分析完毕了
为什么有些时候使用了Dispatcher.IO或者Default,多次launch,但实际还是一个线程调用?可能是因为launch block中内容执行的太快,该worker执行完毕后对下一个launch块,尝试取worker时 worker是空闲的,因此复用了相同的线程
OK 现在我们来看看面经问题
为什么Dispatcher.Default适合执行需要大量CPU运算的工作?
- 线程数量默认与 CPU 核心数接近,避免过度切换,适合 CPU 计算
- 每个线程有自己的本地队列(Local Queue),减少多线程之间竞争,支持高并发下低延迟执行
- 支持 work-stealing (窃取任务),空闲线程会主动去别的线程抢任务,提高 CPU 使用率
- 没有强制的主线程或者 IO 延迟机制,直接跑计算,不会被人为降速或让步,适合纯计算
- Runnable 立即执行,不做深度排队,Runnable 立即执行,不做深度排队
但它也有缺点,比如如果就拿Default来运行大量需要阻塞的Runnable,则效率就会变得非常慢,因为假设有8个CPU核心数,则如果有8个线程都在等I/O结果,整个程序就直接卡死了,后面的任务也没办法运行。
Dispatcher.IO
再来看看Dispatcher.IO呢,顾名思义,它适合管理并运行许多适合IO运算的Runnable。
原理是如果我检测到你提交的是阻塞任务,那么我允许自己扩容线程,可以不断增加线程,因此就算你有一万个网络请求,也可以同时挂着,不会卡死在主线程。
在此之前,可以先了解一个点,Runnable在Scheduler代码层是被人为区分了是否是阻塞还是非阻塞的,而并不是根据Runnable实际调用部分是否真的会引起阻塞
@JvmStatic
public val IO: CoroutineDispatcher get() = DefaultIoScheduler
其本质是一个DefaultIoScheduler, 直接基于ExecutorCoroutineDispatcher,默认的dispatcher 其实为一个LimitedDispatcher, 最大阻塞数目是64或CPU核心数的最大值,其内部又持有了UnlimitedIoScheduler
// DefaultIoScheduler
private val default = UnlimitedIoScheduler.limitedParallelism(
    systemProp(
        IO_PARALLELISM_PROPERTY_NAME,
        64.coerceAtLeast(AVAILABLE_PROCESSORS)
    )
)
// LimitedDispatcher
override fun dispatch(context: CoroutineContext, block: Runnable) {
dispatchInternal(block) { worker ->
dispatcher.safeDispatch(this, worker)
}
}
private inline fun dispatchInternal(block: Runnable, startWorker: (Worker) -> Unit) {
// Add task to queue so running workers will be able to see that
queue.addLast(block)
if (runningWorkers.value >= parallelism) return
// allocation may fail if some workers were launched in parallel or a worker temporarily decreased
// `runningWorkers` when they observed an empty queue.
if (!tryAllocateWorker()) return
val task = obtainTaskOrDeallocateWorker() ?: return
startWorker(Worker(task))
}LimitedDispatcher内部是基于CAS安全的LockFreeTaskQueue的Queue,搭配Synchronized管理,在Dispatch block时会先将task插入到queue中,并新建一个Worker来run这个最新的task, 并最终提交给DefaultScheduler(与Dispatcher.Default相似)来run这个Worker.如果LimitedDispatcher中正在运行的线程数目超过规定的(64),则只会插入到queue中,而不会创建Worker并dispatch(而又由于Worker是LimitedDispatcher的内部类,注意这里的Worker与继承线程的Worker不一样。Worker开启后循环地从LimitedDispatcher的queue中拿task并执行,因此上一个阻塞任务执行完毕后,会立即执行queue中的下一个阻塞任务)。
DefaultScheduler.dispatchWithContext(block, BlockingContext, false)而DefaultScheduler就是Dispatcher.Default用的那一个, 那为什么Dispatcher.IO可以做到启动多个IO阻塞任务,但Dispatcher.Default就不能呢?注意这里启动的方式不同, 这里在启动时,指明了这个Runnable是Blocking的,即BlockingContext实际是true。这也是IO Dispatcher能够处理许多IO阻塞任务的原因
internal fun dispatchWithContext(block: Runnable, context: TaskContext, fair: Boolean) {
    coroutineScheduler.dispatch(block, context, fair)
}
回顾到CoroutineScheduler.dispatch方法中,会根据blocking标志判断,如果是一个阻塞任务,则直接会创建一个Worker执行,而如果是一个非阻塞任务,则会根据已有的非阻塞任务的Worker数来进行判断是否要添加Worker
注意下面的cpuWorkers < corePoolSize 这个判断条件
private fun tryCreateWorker(state: Long = controlState.value): Boolean {
    val created = createdWorkers(state)
    val blocking = blockingTasks(state)
    val cpuWorkers = (created - blocking).coerceAtLeast(0)
    /*
     * We check how many threads are there to handle non-blocking work,
     * and create one more if we have not enough of them.
     */
    if (cpuWorkers < corePoolSize) {
        val newCpuWorkers = createNewWorker()
        // If we've created the first cpu worker and corePoolSize > 1 then create
        // one more (second) cpu worker, so that stealing between them is operational
        if (newCpuWorkers == 1 && corePoolSize > 1) createNewWorker()
        if (newCpuWorkers > 0) return true
    }
    return false
}
也就是:
LimitedDispatcher作用是加一个限制器,避免线程数太多,最多允许max(64, CPUs)个
UnlimitedIoScheduler是真正运行任务的地方,可以创建无限数量的线程
而在Dispatcher.Default的逻辑中,若cpuWorkers的数量达到corePoolSize时,任务是怎样安排的呢?
回顾之前的dispatch代码,在插入时会先检查当前线程是否是Worker,尝试把任务插入到当前Worker的localQueue中,如果不是Worker,则会插入到CoroutineDispatcher的全局Queue中(有阻塞和非阻塞两种Queue,均由LockFreeTaskQueue构成)。并且在之后tryCreateWorker,由于 cpuWorkers数量大于等于corePoolSize,因此不会再创建一个新的Worker(而非阻塞的则会创建 )
实践验证
为了实际验证下为什么Dispatcher.IO与Dispatcher.Default一个适用于大量IO任务,一个适用于计算型任务,我们实际写几个例子
fun main() {
    println(Runtime.getRuntime().availableProcessors())
    runBlocking {
        withContext(Dispatchers.XXX) {
            for (i in 0 until 100) {
                launch {
                    println("$i begin")
                    Thread.sleep(10000)
                    println("$i end")
                }
            }
        }
    }
}
分别以IO与Dispatcher来测试下这个实际执行情况
我这里mbp M1 CPU数目为10个
- Dispatcher.IO: 64个条目打印,后10s后剩余条目打印,并且不分条目启动的先后顺序,总共运行时间 20s
- Dispatcher.Default: 每10s 10个条目打印,并且不分条目启动的先后顺序,总共运行时间 100s
结果与代码吻合
important 为什么这里要用Thread.sleep(10000)
因为在有考虑用delay是因为想到了Room中查询相关操作其实是一个suspend,但其实,room的查询操作加了suspend,底层会启动一个Dispatcher.IO来解决,而并不是说查询操作本身是挂起式的,在传统的阻塞操作中(eg. Http请求、JDBC查询数据库等),都是线程级别的阻塞,所以这里我们使用Thread.sleep进行模拟,而使用delay无法模拟,因为是挂起式的,Dispatcher能够感知。
Dispatcher.Main
类似地,对于主线程的Dispatcher,同理,让我们来看看他的dispatch方法
@JvmField
val dispatcher: MainCoroutineDispatcher = loadMainDispatcher()

private fun loadMainDispatcher(): MainCoroutineDispatcher {
    return try {
        val factories = if (FAST_SERVICE_LOADER_ENABLED) {
            FastServiceLoader.loadMainDispatcherFactory()
        } else {
            // We are explicitly using the
            // `ServiceLoader.load(MyClass::class.java, MyClass::class.java.classLoader).iterator()`
            // form of the ServiceLoader call to enable R8 optimization when compiled on Android.
            ServiceLoader.load(
                    MainDispatcherFactory::class.java,
                    MainDispatcherFactory::class.java.classLoader
            ).iterator().asSequence().toList()
        }
        @Suppress("ConstantConditionIf")
        factories.maxByOrNull { it.loadPriority }?.tryCreateDispatcher(factories)
            ?: createMissingDispatcher()
    } catch (e: Throwable) {
        // Service loader can throw an exception as well
        createMissingDispatcher(e)
    }
}
默认通过FastServiceLoader.loadMainDispatcherFactory()加载工厂类,并使用该工厂类来构造Dispatcher
MainDispatcherFactory
@InternalCoroutinesApi // Emulating DI for Kotlin object's
public interface MainDispatcherFactory {
    public val loadPriority: Int // higher priority wins

    /**
     * Creates the main dispatcher. [allFactories] parameter contains all factories found by service loader.
     * This method is not guaranteed to be idempotent.
     *
     * It is required that this method fails with an exception instead of returning an instance that doesn't work
     * correctly as a [Delay].
     * The reason for this is that, on the JVM, [DefaultDelay] will use [Dispatchers.Main] for most delays by default
     * if this method returns an instance without throwing.
     */
    public fun createDispatcher(allFactories: List<MainDispatcherFactory>): MainCoroutineDispatcher

    /**
     * Hint used along with error message when the factory failed to create a dispatcher.
     */
    public fun hintOnError(): String? = null
}
实际MainDispatcherFactory是一个接口,根据平台的不同(JavaFX/Swing/Android...)有不同的表现,去源码中看
在Java普通程序中的实现为MissingMainCoroutineDispatcher,因为没有指定MainCoroutineDispatcher,当然代码也会报错
@InternalCoroutinesApi
public object MissingMainCoroutineDispatcherFactory : MainDispatcherFactory {
    override val loadPriority: Int
        get() = -1

    override fun createDispatcher(allFactories: List<MainDispatcherFactory>): MainCoroutineDispatcher {
        return MissingMainCoroutineDispatcher(null)
    }
}
private class MissingMainCoroutineDispatcher(
private val cause: Throwable?,
private val errorHint: String? = null
) : MainCoroutineDispatcher(), Delay {
override val immediate: MainCoroutineDispatcher get() = this
override fun isDispatchNeeded(context: CoroutineContext): Boolean =
missing()
override fun limitedParallelism(parallelism: Int, name: String?): CoroutineDispatcher =
missing()
override fun invokeOnTimeout(timeMillis: Long, block: Runnable, context: CoroutineContext): DisposableHandle =
missing()
override fun dispatch(context: CoroutineContext, block: Runnable) =
missing()
override fun scheduleResumeAfterDelay(timeMillis: Long, continuation: CancellableContinuation<Unit>) =
missing()
private fun missing(): Nothing {
if (cause == null) {
throwMissingMainDispatcherException()
} else {
val message = "Module with the Main dispatcher had failed to initialize" + (errorHint?.let { ". $it" } ?: "")
throw IllegalStateException(message, cause)
}
}
override fun toString(): String = "Dispatchers.Main[missing${if (cause != null) ", cause=$cause" else ""}]"
}Android下的Factory实现
那看下Android下的实现呢?
internal class AndroidDispatcherFactory : MainDispatcherFactory {

    override fun createDispatcher(allFactories: List<MainDispatcherFactory>): MainCoroutineDispatcher {
        val mainLooper = Looper.getMainLooper() ?: throw IllegalStateException("The main looper is not available")
        return HandlerContext(mainLooper.asHandler(async = true))
    }

    override fun hintOnError(): String = "For tests Dispatchers.setMain from kotlinx-coroutines-test module can be used"

    override val loadPriority: Int
        get() = Int.MAX_VALUE / 2
}
能想到必然跟Android的主线程运行机制有关,因此必然会涉及到Looper,代码中也就是基于Looper构造了 一个HandlerContext
HandlerContext -> HandlerDispatcher -> MainCoroutineDispatcher
// HandlerContext
override fun dispatch(context: CoroutineContext, block: Runnable) {
    if (!handler.post(block)) {
        cancelOnRejection(context, block)
    }
}
可以看到,最后实际上是这个基于MainLooper的Handler post了这个Runnable出去,所以必然确保了代码能在UI主线程上执行!
同时,对于一些延时方法,比如在ui线程上delay,也会调用到其scheduleResumeAfterDelay的方法,其实本质上也是通过handler post了一个延时任务。
override fun scheduleResumeAfterDelay(timeMillis: Long, continuation: CancellableContinuation<Unit>) {
    val block = Runnable {
        with(continuation) { resumeUndispatched(Unit) }
    }
    if (handler.postDelayed(block, timeMillis.coerceAtMost(MAX_DELAY))) {
        continuation.invokeOnCancellation { handler.removeCallbacks(block) }
    } else {
        cancelOnRejection(continuation.context, block)
    }
}